Software Setup
This section explains how to install Dingo’s operating system and ROS packages. You will need a USB stick of at least 2GB to create the installation media, a wired internet connection, a monitor, and a keyboard.
Creating OS installation media
Note
For installing the OS on an Nvidia Jetson device, see Jetson Xavier AGX or Jetson Nano.
For Intel-family computers (amd64 architecture), you can download Clearpath’s official OS installation images
from here. For Dingo, use the bionic-melodic
image.
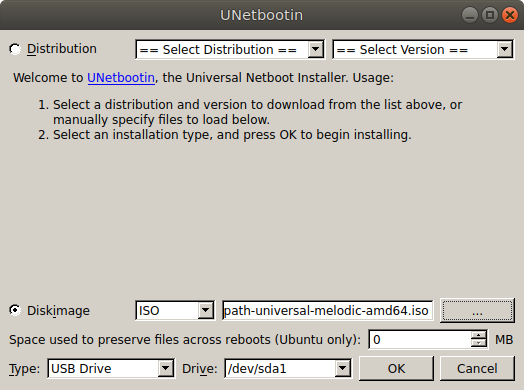
Use unetbootin, or a similar tool, to write the ISO image to a USB memory stick.
Warning
The ISOs currently available from Clearpath are intended to boot into Legacy mode and do not support UEFI. You may need to configure your computer’s BIOS to use legacy boot.
Install the OS
Connect Dingo’s PC to the internet using an ethernet cable and connect a monitor and keyboard. Insert the USB stick you configured in the previous step and power on the PC.
Note
You may need to configure your PC’s BIOS to prioritize booting from the USB device. On most common motherboards,
pressing delete during the initial startup will open the BIOS for configuration.
Installing the OS should require minimal user interaction. The computer will automatically power off when the installation has completed. Once done you can remove the USB stick from the computer.
On first boot after installing the OS you may be prompted to enter a new hostname for the robot. You may assign any name you like, though it should be unique for every robot you have.
Configure the OS
Note
If you installed the OS using the official Clearpath ISO you may skip this section. If you are using an Nvidia Jetson, Raspberry Pi, or installed Ubuntu 18.04 using a normal Desktop or Server installation image from Canonical you will need to do some additional configuration, described below:
First, configure apt to include the ROS and Clearpath package servers by running the following commands:
sudo sh -c 'echo "deb http://packages.ros.org/ros/ubuntu $(lsb_release -sc) main" > /etc/apt/sources.list.d/ros-latest.list'
sudo apt-key adv --keyserver 'hkp://keyserver.ubuntu.com:80' --recv-key C1CF6E31E6BADE8868B172B4F42ED6FBAB17C654
wget https://packages.clearpathrobotics.com/public.key -O - | sudo apt-key add -
sudo sh -c 'echo "deb https://packages.clearpathrobotics.com/stable/ubuntu $(lsb_release -cs) main" > /etc/apt/sources.list.d/clearpath-latest.list'
sudo apt-get update
sudo apt-get install python-rosdep ros-melodic-catkin
sudo rosdep init
sudo wget https://raw.githubusercontent.com/clearpathrobotics/public-rosdistro/master/rosdep/50-clearpath.list -O /etc/ros/rosdep/sources.list.d/50-clearpath.list
rosdep update
echo "source /opt/ros/melodic/setup.bash" >> ~/.bashrc
source ~/.bashrc
Dingo is configured to use the 192.168.131.* network to address the MCU and any sensors you connect via ethernet. To
accomplish this, you must run the following commands:
sudo apt-get install bridge-utils ifupdown bluez-tools
sudo nano /etc/network/interfaces
Copy and paste the following into /etc/network/interfaces and save the file:
auto lo br0 br0:0
iface lo inet loopback

# Bridge together physical ports on machine, assign standard Clearpath Robot IP.
iface br0 inet static
  bridge_ports regex (eth.*)|(en.*)
  address 192.168.131.1
  netmask 255.255.255.0
  bridge_maxwait 0

# Also seek out DHCP IP on those ports, for the sake of easily getting online,
# maintenance, ethernet radio support, etc.
iface br0:0 inet dhcp
For managing the robot’s wireless network, we recommend installing wicd-curses:
sudo apt-get install wicd-curses
Run wicd-curses and press shift + p to open the preferences. Remove the wired interface; the wired interface is
already configured using /etc/network/interfaces and allowing wicd to control it may cause problems with the network
bridge.
Install the Dingo packages:
sudo apt-get install ros-melodic-dingo-robot
You may optionally install the Dingo desktop and simulation packages as well, though these are generally not needed on the robot:
sudo apt-get install ros-melodic-dingo-desktop ros-melodic-dingo-simulator
Install Dingo Software
Once the packages have been installed, the Dingo bringup service must be configured. Run
rosrun dingo_bringup install
sudo systemctl daemon-reload
Before launching the ros service, make sure to configure /etc/ros/setup.bash correctly. Most importantly,
you should add the following if you have a Dingo-O:
export DINGO_OMNI=1
If you have a Dingo-D, instead you may add:
export DINGO_OMNI=0
Save /etc/ros/setup.bash and run
sudo systemctl start ros
If you need to restart ROS, you can run
sudo systemctl restart ros
at any time.