Creating a Workspace and Publisher
We will first be creating a workspace to work from, then we will write a simple publisher that will make our virtual Husky drive around randomly. This tutorial is intended for Ubuntu 20.04 (Focal) and ROS Noetic.
Creating a Workspace and Package
Before we begin writing a node, we need to create a workspace and a package. Workspaces are simply directories to store all of your packages. First we will need to create a new directory.
mkdir ~/ros101
This created a directory in your home folder which we will use as a workspace directory. We now need to create a subdirectory in your workspace directory to store all your source code for your packages.
mkdir ~/ros101/src
The last step to creating the workspace will be to initialize the workspace with catkin_init_workspace.
cd ~/ros101/src
catkin_init_workspace
Now that our workspace has been created, we will create a package in the src directory we just created. This can be done by navigating to the ~/ros101/src directory, which you should have already done in the last step. We can create the package using the catkin_create_pkg command followed by what we want the package to be named, and then followed by what other packages our package will be dependent on. All this command really does is creates another directory for your new package, and two new configuration files inside that directory with some default settings.
catkin_create_pkg random_husky_driver roscpp std_msgs
You can see that this created CMakeLists.txt and package.xml inside the random_husky_driver directory, this is also where you will store all your source code for your packages. The roscpp and std_msgs dependencies were added into the MakeLIst.txt and package.xml.
Writing the Publisher
As mentioned in our previous post, a publisher publishes messages to a particular topic. For this tutorial, we will be publishing random commands to the /husky_velocity_controller/cmd_vel topic to make your Husky visualization drive itself. Start by creating a file in your ~/ros101/src/random_husky_driver directory called random_driver.cpp. First make sure you’re in the random_husky_driver directory and type the following.
gedit random_driver.cpp
This will create and open the new driver file. Within the new driver file, copy the following code.
#include <ros/ros.h>
#include <geometry_msgs/Twist.h>
#include <stdlib.h>

int main(int argc, char **argv) {
//Initializes ROS, and sets up a node
ros::init(argc, argv, "random_husky_commands");
ros::NodeHandle nh;

//Ceates the publisher, and tells it to publish
//to the husky_velocity_controller/cmd_vel topic, with a queue size of 100
ros::Publisher pub=nh.advertise<geometry_msgs::Twist>("husky_velocity_controller/cmd_vel", 100);

//Sets up the random number generator
srand(time(0));

//Sets the loop to publish at a rate of 10Hz
ros::Rate rate(10);

  while(ros::ok()) {
    //Declares the message to be sent
    geometry_msgs::Twist msg;
    //Random x value between -2 and 2
    msg.linear.x=4*double(rand())/double(RAND_MAX)-2;
    //Random y value between -3 and 3
    msg.angular.z=6*double(rand())/double(RAND_MAX)-3;
    //Publish the message
    pub.publish(msg);

    //Delays until it is time to send another message
    rate.sleep();
    }
}
Lets break down this code line by line,
#include <ros/ros.h>
#include <geometry_msgs/Twist.h>
These lines includes the headers that we are going to need. The <ros/ros.h> header is required for ROS functionality and the <geometry_msgs/Twist.h> is added so that we can create a message of that type.
ros::init(argc, argv, "random_husky_commands");
ros::NodeHandle nh;
The first line, ros:/:init, is used to initialize the ROS node, and name it “random_husky_commands”, while ros:NodeHandle starts the node.
ros::Publisher pub=nh.advertise<geometry_msgs::Twist>("husky_velocity_controller/cmd_vel", 100);
Publishing a message is done using ros:Publisher pub=nh.advertise, followed by the message type that we are going to be sending, in this case it is a geometry_msga::Twist, and the topic that we are going to be sending it too, which for us is husky_velocity_controller/cmd_vel. The 100 is the message queue size, that is, if you are publishing message faster then what roscpp can send, 100 messages will be saved in the queue to be sent. The larger the queue, the more delay in robot movement in case of buffering. Therefore in a real life example, you will want to have a smaller queue in the case of robot movement, where delay in movement commands are undesirable and even dangerous, but dropped messages are acceptable. In the case of sensors, it is recommended to use a larger queue, since delay is acceptable to ensure no data is lost.
ros::Rate rate(10)
...
rate.sleep()
ROS is able to control the loop frequency using ros:Rate to dictate how rapidly the loop will run in Hz. rate.sleep will delay a variable amount of time such that your loop cycles at the desired frequency. This accounts for time consumed by other parts of the loop. All Clearpath robots require a minimum loop rate of 10Hz.
while(ros::ok())
The ros::ok function will return true unless it receives a command to shut down, either by using the rosnode kill command, or by the user pushing Ctrl-C in a terminal.
geometry_msgs::Twist msg;
This creates the message we are going to send, msg, of the type geometry_msgs:Twist
msg.linear.x=4*double(rand())/double(RAND_MAX)-2;
msg.angular.z=6*double(rand())/double(RAND_MAX)-3;
These lines calculate the random linear x and angular z values that will be sent to Husky.
pub.publish(msg)
We are finally ready to publish the message! The pub.publish adds msg to the publisher queue to be sent.
Compiling the Random Husky Driver
Compilation in ROS in handled by the catkin build system. The first step would usually be to set up our package dependencies in the CMakeLists.txt and package.xml. However this has already been done for us when we created the package and specified our dependencies. The next step is then to declare our new node as a executable, this is done by adding the following two lines to the CMakeLists.txt files in ~/ros101/src/random_husky_driver. You can add them as the last two lines in the file.
add_executable(random_driver random_driver.cpp)
target_link_libraries(random_driver ${catkin_LIBRARIES})
The first line creates the executable called random_driver, and directs ROS to it’s source files. The second lines specifies what libraries will be used. Now we need to build our workspace using the catkin_make command in the workspace directory
cd ~/ros101
catkin_make
Let’s bring up the husky visualization as we did in a previous blog post.
roslaunch husky_gazebo husky_empty_world.launch
The final step is to source your setup.bash file in the workspace you have created. This allows ROS to find the packages that are contained in your workspace. Dont forget this process will have to be done on every new terminal instance!
source ~/ros101/devel/setup.bash
It’s now time to test it out! With gazebo still running, lets start the node.
rosrun random_husky_driver random_driver
You should now see Husky drive around! In a new terminal window, we can make sure that our node is publishing to the /husky_velocity_controller/cmd_vel topic by echoing all messages on this topic
rostopic echo /husky_velocity_controller/cmd_vel
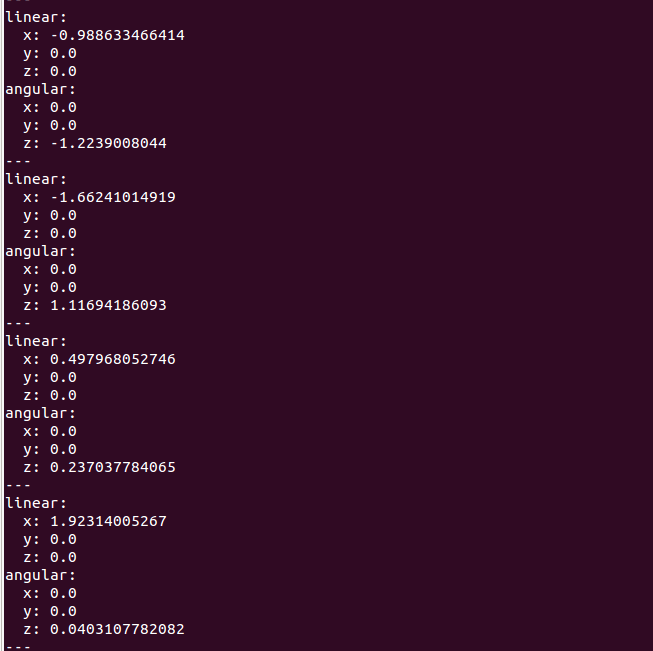
You should now see a stream of random linear x and angular z values.