Simulating Moose
Whether you actually have a Moose robot or not, the Moose simulator is a great way to get started with ROS robot development. In this tutorial, we will go through the basics of starting Gazebo and Rviz and how to drive your Moose around.
Note
Before you can use this tutorial, make sure you have installed Moose’s software
Launch Gazebo
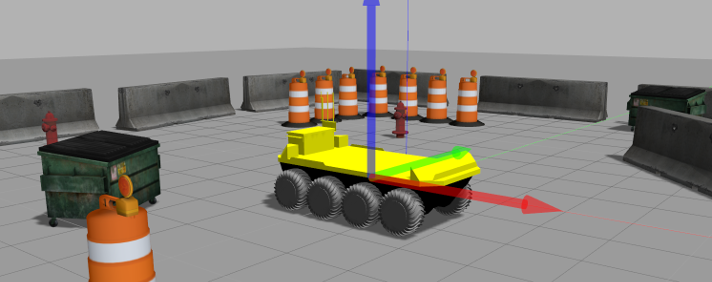
Gazebo is the most common simulation tool used in ROS. Moose’s model in Gazebo include reasonable approximations of its dynamics, including wheel slippage, skidding, and inertia. To launch simulated Moose in a simple example world, run the following command:
roslaunch moose_gazebo moose_world.launch
You should see the following window appear, or something like it. You can adjust the camera angle by clicking and dragging while holding CTRL, ALT, or the shift key:

The window which you are looking at is the Gazebo Client. This window shows you the “true” state of the simulated world which the robot exists in. It communicates on the backend with the Gazebo Server, which is doing the heavy lifting of actually maintaining the simulated world. At the moment, you’re running both the client and server locally on your own machine, but some advanced users may choose to run heavy duty simulations on separate hardware and connect to them over the network.
Note
When simulating Moose, you must leave Gazebo running. Closing Gazebo will prevent other tools, such as rviz (see below) from working correctly.
Launch rviz
The next tool we will encounter is rviz. Although superficially similar in appearance to Gazebo, rviz has a very different purpose— unlike Gazebo, which shows the reality of the simulated world, rviz shows the robot’s perception of its world, whether real or simulated. So while Gazebo won’t be used with your real Moose, rviz is used with both.
You can using the following launch invocation to start rviz with a pre-cooked configuration suitable for visualizing any standard Moose config:
roslaunch moose_viz view_robot.launch
You should see rviz appear:
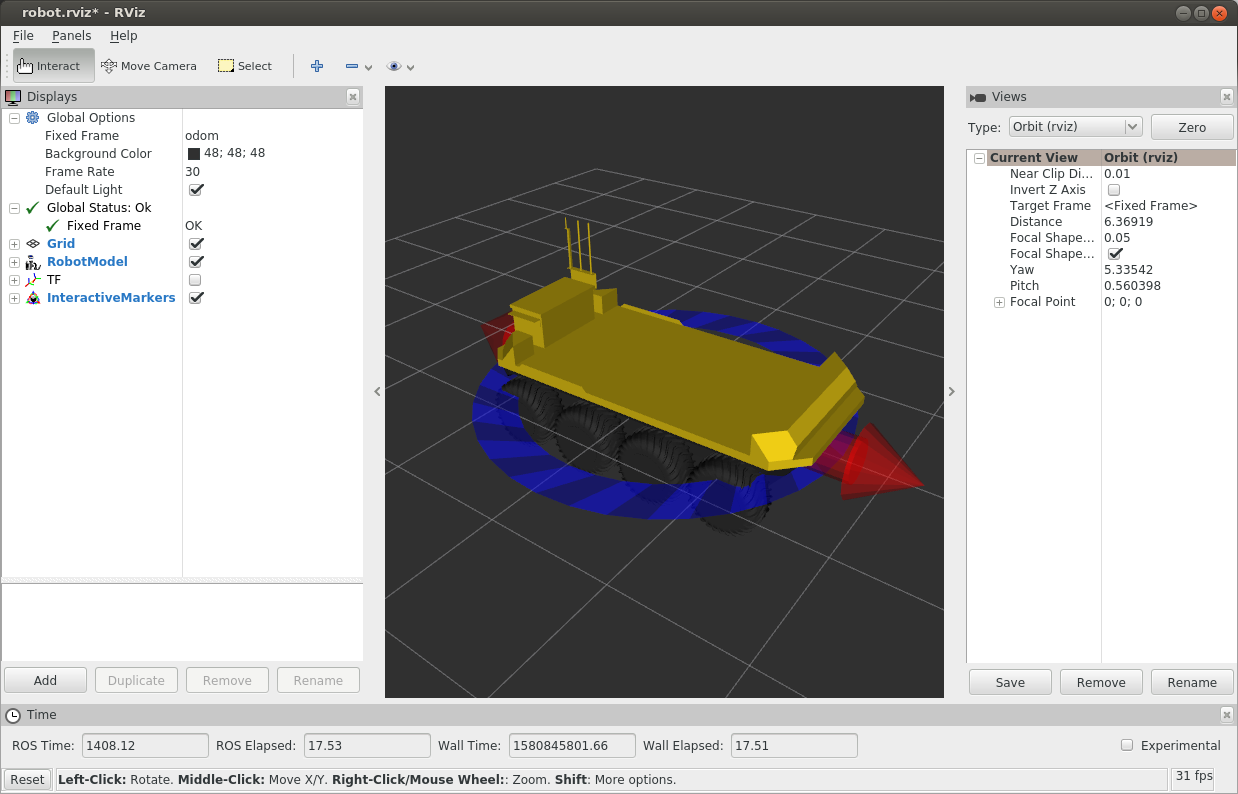
The rviz display only shows what the robot knows about its world, which presently, is nothing. Because the robot doesn’t yet know about the barriers which exist in its Gazebo world, they’re not shown here.
Controlling Moose
What is shown, however, is Moose’s interactive markers. These are the simplest way to command your robot to move around. If you don’t see them in your rviz display, select the Interact tool from the top toolbar. You should see red arrows and a blue circle appear around the Moose model.
Drag the red arrows in Rviz to move in the linear x and the blue circle to move in the angular z. Rviz shows you Moose moving relative to its odometric frame, but it is also moving relative to the simulated world supplied by Gazebo. If you click over to the Gazebo window, you will see Moose moving within its simulated world. Or, if you drive real Moose using this method, it will have moved in the real world.
All of Clearpath’s robots use the same coordinate system, shown below:
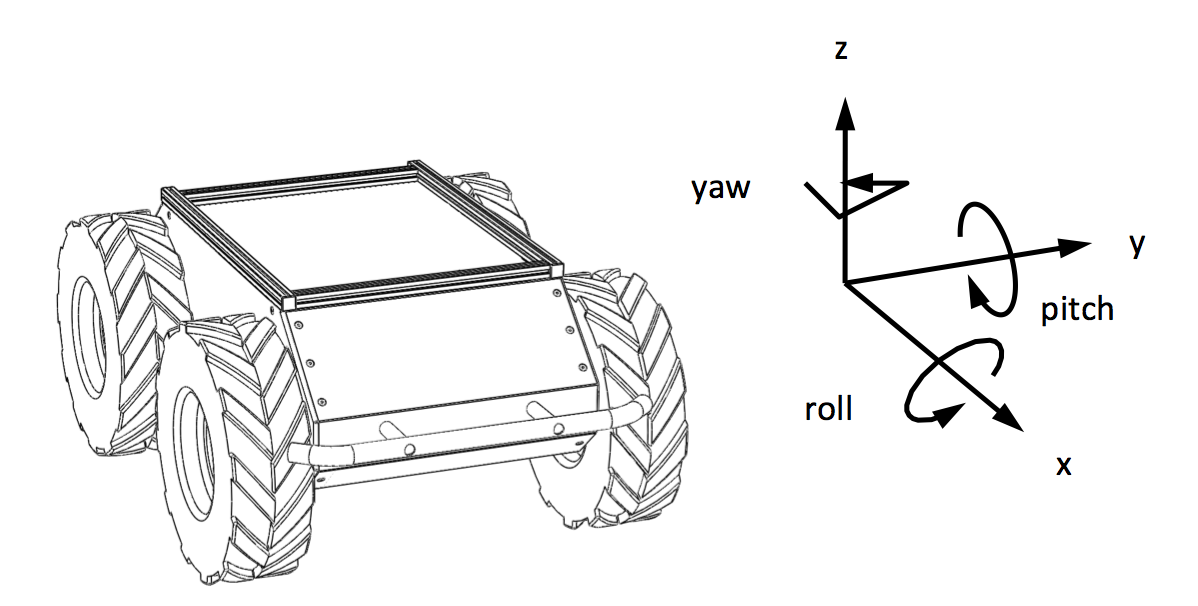
Axis |
Positive Meaning |
Negative Meaning |
|---|---|---|
X |
Linear motion forwards |
Linear motion backwards |
Y |
Linear motion left |
Linear motion right |
Z |
Linear motion up |
Linear motion down |
X^ (roll) |
Roll to the right |
Roll to the left |
Y^ (pitch) |
Pitch down |
Pitch up |
Z^ (yaw) |
Rotate left |
Rotate right |
Moose, in its default configuration, will treat the linear Y & Z axes, as well a the angular X & Y axes, as zero at all times; the robot is incapable of moving in these directions.
Once you start your own development, have your nodes send geometry_msgs/Twist commands to the cmd_vel
topic to drive Moose, either real or simulated. This is the standard ROS interface to differential-drive and
holonomic ground vehicles.
The geometry_msgs/Twist message includes fields for linear X/Y/Z in m/s, as well as fields for angular X/Y/Z
in rad/s.
$ rosmsg info geometry_msgs/Twist
geometry_msgs/Vector3 linear
  float64 x
  float64 y
  float64 z
geometry_msgs/Vector3 angular
  float64 x
  float64 y
  float64 z
Using a Game Controller
You can use a game controller, e.g. a PS4 or Xbox One bluetooth controller, to drive Moose in the simulation.
To do so, first pair your controller with your PC. Once paired, your controller should appear on your system as /dev/input/js*
where * is a number starting at zero. Make a note of what joy device your controller mapped to, and run the following commands,
substituting js0 as appropriate:
export MOOSE_JOY_TELEOP=1 export MOOSE_JOY_DEV=/dev/input/js0
Then launch Gazebo as described earlier. You should be able to drive Moose by holding the left shoulder button and moving the left thumb stick.