Keeping Jackal Updated
Note
If you are upgrading your Jackal from an older version of ROS, please refer to our upgrade instructions here.
Jackal is always being improved, both its own software and the many community ROS packages upon which it depends! You can use the apt package management system to receive new versions all software running on the platform.
Getting New Packages
Each Jackal leaves the factory already configured to pull packages from http://packages.ros.org as well as http://packages.clearpathrobotics.com. To update your package and download new package versions, simply run:
sudo apt-get update
sudo apt-get dist-upgrade
If you see any errors, please get in touch and we’ll see if we can get you sorted out.
MCU Firmware Update
Note
Jackal’s MCU is mounted to the rear inside wall of the robot. To access it, open the lid, keeping the computer tray secured to the underside of the lid.
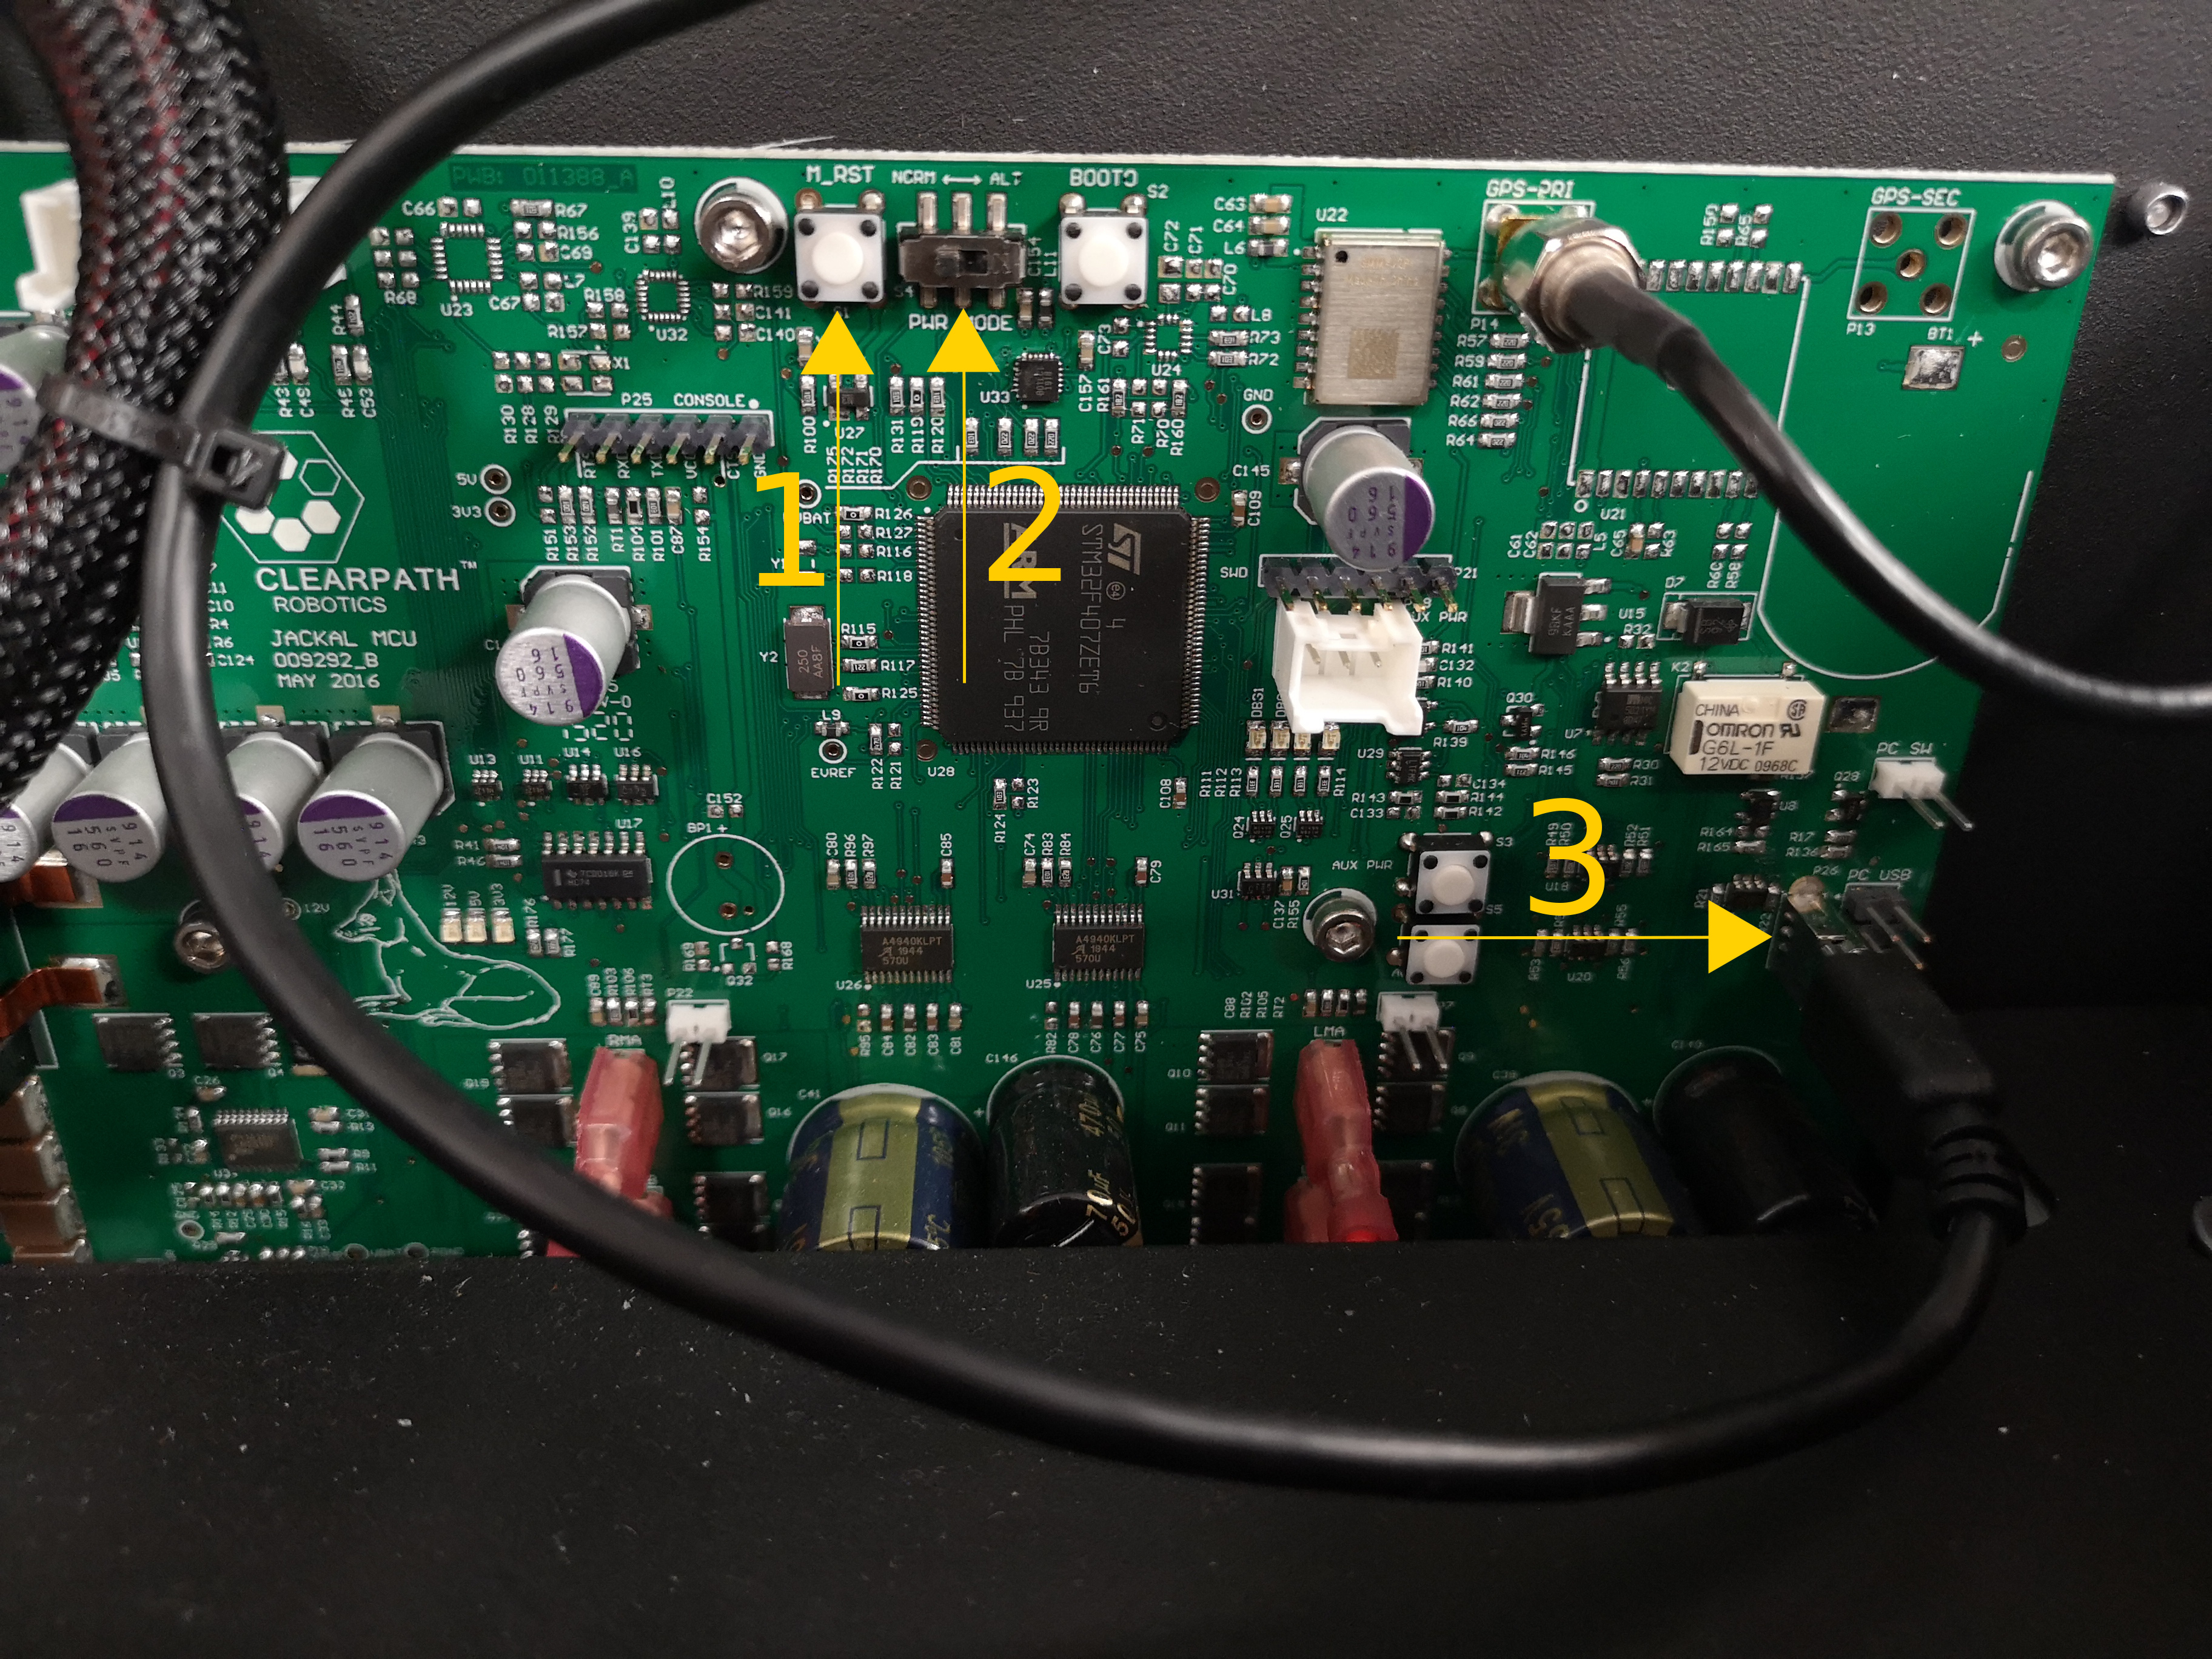
The
M_RSTbutton, used to reset the MCUThe MCU mode switch. Left is
NORMor normal mode, right isALTused for flashing the firmwareThe mini-USB port used for transmitting data. This should be connected to Jackal’s PC for both normal operation and firmware flashing
When you update packages, there is periodically a new version of Jackal’s firmware available. You will know this is the case in one of two ways:
The firmware and PC are unable to connect to each other, which will be apparent if the two-arrow comms indicator fails to come on after system bootup.
If the firmware version number in the
/statusmessage does not match the package version output bydpkg -s ros-melodic-jackal-firmware. In the future there will be an automated check for this which outputs a diagnostics warning when a firmware update is available to be applied.
If new firmware is available, follow the below procedure to flash it to Jackal’s MCU:
Place Jackal up on blocks. Firmware loading does not usually result in unintended motion, but it’s safest when off the ground.
Ensure that Jackal is powered-on. Open the lid of the robot to expose the MCU.
Make sure the mini-USB cable (
3in the image above) is connected to Jackal’s PC.Move the mode switch (
2in the image above) toALT(right)Press
M_RST(1in the image above) to enter boot loader modeThe MCU is now in bootloader mode, ready to receive new firmware.
Now, from Jackal’s PC (connected via SSH or screen/keyboard), execute:
rosrun jackal_firmware upload
You should see about 20 seconds worth of lines output beginning with Download from image .... When this is
complete perform the following steps to restore normal operation:
Move the mode switch back to
NORM(left)Press
M_RST. You must perform this step within a few seconds of changing the mode switch. If you take too long Jackal may power down. This is fine and won’t harm the robot, but can be annoying.
If the robot powers-down, simply ensure the mode switch is in the NORM position and power the robot back on.
Jackal will now be using the new firmware you installed.
Starting From Scratch
If Jackal’s computer has become inoperable, or for any reason you want to restore it to the factory state, begin by opening Jackal, lowering the computer tray, and connecting a screen and keyboard, as well as a wired internet connection. You can then download the most recent version of the Jackal boot ISO from the following location:
https://packages.clearpathrobotics.com/stable/images/latest/
Use unetbootin or a similar tool to flash the ISO image to a USB memory stick. Boot Jackal’s computer with the USB memory connected, and you should be in the purple Debian/Ubuntu installer. The installer runs by itself and shuts down the computer when finished.
Once done, turn Jackal on once more, and run the following:
rosrun jackal_bringup install
This installs Jackal’s robot_upstart job, so that ROS starts each time the robot starts.
Note that if you may need to re-pair your gamepad to the robot, and you’ll have some extra work to do if you have integrated accessories which require additional launchers or URDF.
Bluetooth Controller Pairing
If your PS4 controller runs out of batteries, or you purchase a new one, you might want to re-pair your platform and controller. To do this, put the controller into pairing mode by pressing and holding the Share & PS buttons until the controller’s LED flashes rapidly in white. Then SSH into the robot and run
sudo ds4drv-pair
If ds4drv-pair fails to detect the controller, you can connect it manually by running sudo bluetoothctl
and entering the following commands into the bluetooth control application:
agent on
scan on
The bluetooth scan will display the MAC addresses of nearby devices. Determine with MAC address corresponds to the controller and copy it. Then run the following commands in bluetoothctl:
scan off
pair <MAC Address>
trust <MAC Address>
connect <MAC Address>
The controller should now be correctly paired.
Teleoperation
To enable the controller you must hold down either the left or right shoulder buttons on the controller (L1 and R1 on the PS4 controller. The left button is for normal operation, while the right button enables turbo speed.
Warning
When familiarizing yourself with Jackal’s operation, always hold the left button (L1). Once you are comfortable with how Jackal operates, and you are in a large area with plenty of open room, then you can use R1 to enable turbo mode.
Once the controller is paired, you can use the left thumb-stick to drive the robot. The vertical axis controls the robot’s speed and the horizontal axis controls the robot’s turning.